
Creating and uploading a seller.json file for Google AdSense requires a few steps. This file helps you declare the authorized sellers of your ad inventory and can enhance ad serving on your website. Below are step-by-step instructions on how to create and implement a seller.json file:
Step 1: Understand seller.json
- The seller.json file is a JSON file that provides transparency about the authorized sellers of your ad inventory. It helps ensure that only trusted sellers can monetize your inventory.

Step 2: Create the JSON File
Open a text editor such as Notepad (Windows) or TextEdit (Mac).
Create a new plain text document.
Add the following JSON structure, customizing it with your information:
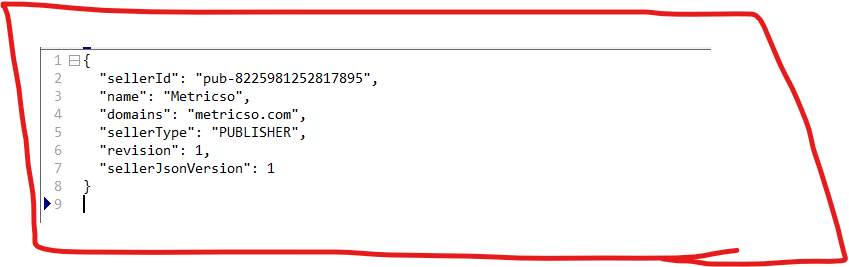
{ “sellerId”: “your-seller-id”, “name”: “Your Website’s Name”, “domains”: [“yourwebsite.com”], “sellerType”: “PUBLISHER”, “revision”: 1, “sellerJsonVersion”: 1 }
- Replace “your-seller-id” with your unique seller ID.
- Replace “Your Website’s Name” with the name of your website.
- Replace “yourwebsite.com” with your website’s domain name.
Step 3: Save the JSON File
- Save the file with the name seller.json. Ensure it is saved as a plain text file with the extension .json.
Step 4: Upload to Your Website
Access your website’s server or hosting control panel.
Navigate to the root directory of your website. This is typically where your website’s main files are located.
Upload the seller.json file to the root directory of your website using File Transfer Protocol (FTP) or your hosting provider’s file manager.
Using the text and edit plus editors, you may generate the file anywhere on your computer. Then, all you have to do is open your cpanel and ftp (filezila), click the Public_HTML folder, and upload your JSON file to the root server.
Step 5: Verify the File
- After uploading, you can verify that the seller.json file is accessible by accessing it in a web browser. For example, if your website is https://www.metricso.com, you should be able to access the file at https://www.metricso.com/seller.json.
- For example we are creating the seller.json file for our website “metricso.com” now simply i can do open it on the bowser with fill address like https://metricso.com/seller.json. it will be verified.
Here you can do the same process to look this video.
Step 6: Inform Google AdSense
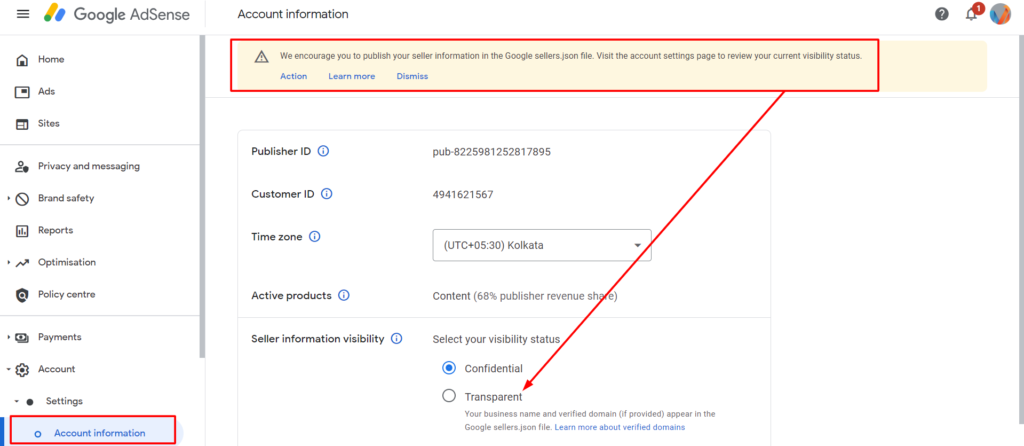
Simply Open your Google AdSense, Click on the Action button on the seller.json file. will populate the below you will do accordingly.
According to this above image you can click on the Account information, click on the Transparent radio button. then a box will create.
like that

Log in to your Google AdSense account.
Go to the “Settings” section.
Under “Account information,” click on “Edit” next to “Seller information.”
Enter your seller ID and click “Submit.”
Step 7: Monitor and Test
After verified the seller.json file will see like that

- Google will review and validate your seller.json file. It may take some time for the changes to take effect. Monitor your AdSense performance to ensure everything is working correctly.
That’s it! You’ve successfully created and implemented a seller.json file for Google AdSense. This helps enhance transparency and control over who can serve ads on your website, ultimately improving the ad experience for your users.